-
MEETUPS ABOUT THE FAMOUS
Vicente
SCARAMUZZA
Technique
USED BY THE BEST PIANISTS IN THE WORLD
LIKE MARTA ARGERICH, BRUNO GELBER
OR DANIEL BARENBOIM
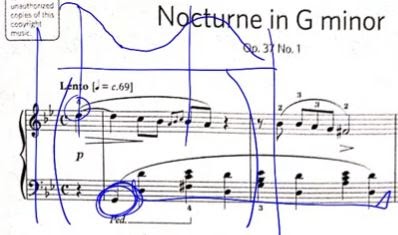
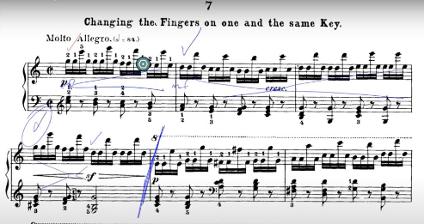
The meeting of today was about refreshing the first bar of the Chopin Nocturne in G minor.
As the last week’s meeting, we focused on the left hand. Although, we also touched some aspects of the right hand.
Let’s recap the movements of the left hand:
FIrst note G: Forearm mov. - leaving the note preparing arm mov for the next note
D and D (octave) : small Arm mov. - holding the finger n.1, and using it as a pivot for the next chord
VII dimished chord: big Arm mov. - changing finger n5 for n3 on the F# and preparing a small Arm mov. for the next octave
Octave: small Arm mov. - holding the finger n.1, and using it as a pivot for the next chord
VI chord: big Arm mov.(less than the previous chord) - changing finger n5 for n3 on the G and preparing a small Arm mov. for the next octave
Octave: small Arm mov. - holding the finger n.1, and using it as a pivot for the next chord
II chord: big Arm mov.(a little bit more than the previous chord) - changing finger n5 for n3 on the A and preparing a small Arm mov. for the next octave
-We would follow the same technical process within this pattern -
Melody of the right hand:
We start on the D with a generous and gentle Forearm mov. On the next notes we will use Finger mov., from the surface of the key, so we get a very soft C and B.
We continue with Finger mov. on the ornament, and at the same time, we lift a little bit more the finger n.3 to play - from a bigger distance - the accented quaver B. The following A will be much softer,- so from the surface of the key.
Afterwards, Forearm. mov on the rests and the repeated B’s, delivering a slightly bigger Forearm mov. on the second B, as is the accented one.
This B-A-G quavers are leading to the minim F# , all delivered with Finger mov.
Some observations:
When playing, for example, the D’s octave and we deliver a small Arm mov so it sounds soft, we have to make sure we are actually letting all of our weight fall on the keys, and not trying to hold the arm “just so it sounds softer”.
It would happen the same with any note that is played through the finger mov. When we play from the surface of the key, is important to relax the finger and make sure the elbow and shoulder is completely relaxed.
Another thing to take into account, when delivering the arm mov., is to not to move the wrist only, but making sure we relax the whole arm and the wrist stays straight and lined with the rest of the arm.
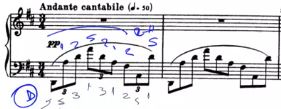
After a few months without our great weekly Scaramuzza meetings, we’re finally back !
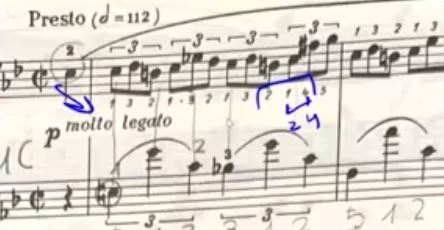
Today we started the meeting analysing technically the Nocturne in G minor op.37 no.1 by Chopin
Our main goal today is to deliver a success pedal finger on the left hand. By doing this, we’ll be able to use the foot pedal as a resource for enhancing the sounds, and not as a mean for connecting notes
We start with a forearm mov on the right hand. As the first note has to last two beats and it’s our first peak of the phrase, we would deliver a potent forearm mov. The first note of the left hand will follow the same technical process.
Let’s talk about the LH accompaniment…
As we said, the left hand starts with forearm mov on the first note, and after that, arm movement (for both the octaves D and the chords) on the D’s.
We link the left hand by sustaining the first finger on the D, and using it as a pivot to deliver the next arm mov. on the chord. Afterwards, we change the 5th finger (on the same note) for a 3rd finger to link the chord with the next D’s octave, with arm mov. as well. We will repeat this technical process for the next bars.
In general, the dynamics of the left hand will be much softer, so the right hand melody can shine and be heard over the chords.
About the melody, we can see two clear peaks. The first one on the first D, and the next one on the B (See image below )
Prokófiev nº3 - Wrist mov.
-meeting on 22nd /June-
In this meeting we covered the introduction of the Prokofiev nº3, with the wrist movement.
The first challenge we find are the notes of the left on the beginning.
We will use the forearm movement to play the first E, after that, finger movement , and finally wrist movement on the two last E’s (being the second one just a rebound of the first one)
The right hand starts straight with wrist movement.
It’s very important to deliver a small wrist movement on the chords, to get more acceleration, as the passage is very fast.
We should remember that all the “tension” is in the triceps, and not in the wrist.
Beethoven's Pathetic Sonata
Rotation movement 18.06.2020
In the meeting of today, we covered the first movement of the Beethoven’s Pathetique Sonata.
We focused on several aspects of the rotation movement applied to the octaves of the left hand:
- As the shape of the bass is not like an alberti bass, but as a tremolo, the pivot is not like in other examples.This time pivot and focal point will be in a very close position.
- The approach to the first note will be ferociously , but the rest will be soft. Always trying to consciously to have the hand relaxed and stable, while delivering the movement with a rebound effect (spastic movement).
- We won't lift the focal point as we do in other examples of the rotation mov, instead, we will have both focal point
and pivot close to the keys. Each of them are still doing it’s own function , but in a very light and small way. - Another way to polish the tension on the scale would be to, instead of start accelerating from the C, we do the contrary: hold a little bit the tempo on the C just before the D, E, F… , so we “breathe” before starting to accelerate.
- We should let the hand rebound, in a spastic way, relaxed. If we think about every note we won't get the relaxation on the correct speed.
This is a very difficult passage to success on the relaxation, but through the rotation movement (and practice) we can get a great performance with no tensions.
Rotation movement - 10.06
Complete Review
The Scaramuzza meeting of today was entirely dedicated to review the rotation movement step by step:
*Reminder*
The rotation movement is an horizontal movement compund by two elements: the pivot and the focal point.
Shoulders relaxed, arms with a 90º degree angle,
without the piano:
-Place the hands with the palms up, and then palms down. Repeat, coordinating them.
-With the hand relax, experiment a big and slow rotation. Then a small and slow rotation.
-We would do the previous exercise but in a spastic way. Big rotation and small rotation
We should experiment this exercise at least for about a week.
On the piano:
-Fingers 1 and 2 together on the same key, as the pivot,(staying ) and rotate playing with the rest of the fingers.
We could call this step the “Screwdriver” as the movement is similar.
-Then finger 1 as the pivot, staying on the key; playing the rest of the fingers (focal points) by rotating
- Finally we would do all the movement, in a controlled way. The pivot is always either supporting all the weight or relaxing, so staying on the surface of the key; but it should never be lifted.
Things to have in mind:
-Always check your elbow and make sure it’s completely relaxed.
-As said previously, the elbow shouldn’t move while doing the rotation, only the wrist.
-When playing the focal point, all fingers act like one. This means that the finger that has to play will be the most prepared, but all the rest accompany (relaxed) that one that is playing.
Watch the entire meeting here!
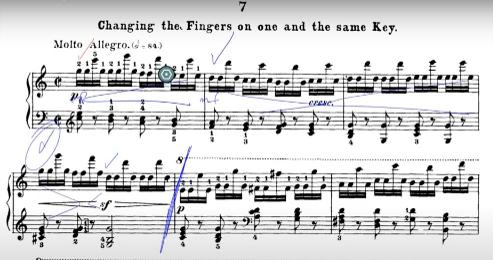
Meeting 01st of June - Czerny op.740
Wrist Movement
Today we came back to exercise number 7 of Czerny op.740.
We already saw these bars briefly a few weeks ago when one of our students joined the meeting, as he was struggling with this passage: Check that meeting here
We will use the wrist movement, as it’s the ideal movement for fast and repeated notes.
For the first four semiquavers, we deliver a “big” wrist movement on the first one, as is the most accented one of the four. The second semiquaver will be played from a very less distance than the first one, sounding much softer.
The third semiquaver has a more significant accent, and it’s also a 6th above; this means that the movement will be delivered by changing slightly the angel of the wrist (in relation to the foream), so it’s directed to the note. Finally, the fourth semiquaver will be the softest/less accented one.
A crucial thing to have into account is that the hand should be on a resting position every time possible. With this, we refer that after delivering the finger, playing the key, we go back to the relaxation of the wrist (resting position, which -remember- it’s always a little bit more up than the keys) , instead of having our hand-stretched all the time.
We appreciated two ways of playing this Czerny exercise successfully:
-The “usual” and “easiest” way to play the right hand would be to do everything with the wrist movement, which is the best option for teaching to the students.
-The difficult way would be to add rotation movement to link the octaves. This manner is much hard because we are combining two different movements in a minimal amount of notes and time.
Listen to the whole meeting here !
More information about the Scaramuzza technique
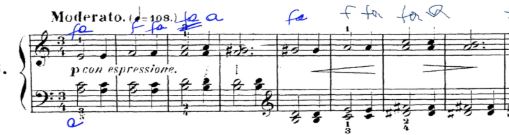
Meeting on the 19th of may - rachmaninov op.23
The Scaramuzza meeting of today was about the Rachmaninov op.23 nº4
We focused entirely on the two first bars, where we can appreciate an expanded chord of D major. The goal is to hear the three notes of the music: D,A, F.
The way in we delivery this first two bars will determinate the character and sound of the whole piece.
We can see three significant aspects to take the beauty out of these two bars: tempo, dynamics and their relation to the technique.
The first bar, all with the left hand:
On the beginning, we are going up.
So as we are “climbing” up, it should “costs us an effort”, so we would do a little ritardando, until the A, where we start “falling “( little accelerando until the F, (which we’ll use as a pivot to go to the A), and then from A to high D, with a smooth ritenuto.
The technique here is crucial because it allows us to do all the dynamics with the highest precision; by using the forearm movement,finger movement and rotation in a very controlled and conscious way.
For the notes of the chord that should be perfectly heard, we lift the fingers so there's more distance to the keys and we make sure that that note will be above the rest.
About the dynamics, we always have the three accents on the D (a presence D), A (the most accented note) and F (the less accented note). So when going up, we do a crescendo until the A, decrescendo until the F , which we’ll do successfully by playing the D, A louder than the F, which will be much soft, so the effect is noticed.
More information abour rhis meeting here
Meeting on 8th of April
Today we focused on the Wrist Movement.
We had as a guest a young student who was struggling with a passage of the Czerny op740 number 7.
We already explained how to start the movement (the spastic and controlled spastic way)on the 22th / April meeting.
Today we will explain how to delivery the movement on the piano:
-We would start with the controlled way and the spastic way explanation.
-We should have the wrist a little bit more up, related to the distance of the piano, so our rest position (the position in which we can be relaxed with no tensions, feeling comfortable) is the one at the moment.
-We prepare the hand, lifting the wrist and making the finger that is going to play ready to support all the weight when it falls.
-Then we let the hand fall, relaxing and giving all of our weight supported by that finger that was ready to play.
Then we went with the piece in question
This etude is very fast, so we need the wrist movement from the beginning.
We will make an excellent homogenous playing if we work with accents and dynamics.
In the end, we saw a little passage of the Beethoven sonata op.49 nº2, where our student-guest was having some problems related to the wrist movement.
Something significant happened, and it was that our student when delivering the movement, he was mixing it up with the forearm movement.
This is something very common, and we have to be aware and be careful when doing the wrist movement: We move only the wrist, not the rest of the arm.
More information here !
Starting mf with an accent on the first note, doing a crescendo at the end of the bar so that we can do an accent on the (D) first note of the second bar.
On the second bar, we do a descrescendo so that we can do a crescendo on the third bar (always with an accent on the first note of each bar).
The fourth bar starts loud (G)(we come from a crescendo, so this would be the climax of this four bars), having a sf on the middle of the bar (D). That sforzando would be the second accent of the bar, but less accented than the first note of the bar (G)
Scaramuzza meeting on 1st of May
Heller Etudes op.125, number 2.
Technique:
Right hand:
We would start with forearm movement between the repeated notes.
Between the different notes, we would use finger movement (between the bars most of the times)
On the third bar, we have two notes at the same time, so we are going to use the arm movement only on bars 3 to 4; same as the bars 8 and 9.
Left hand :
Arm movement all the time, having the strong note on the first beat of each bar.
We discuss the expansion the left hand has to do on bar number 5 of the second line. Some beginner students don’t have the stretching necessary for some intervals. Ways to work this:
For playing, we can (through the arm movement) play first the bottom note (C, out of beat) and then the other two (G and top C, on the beat ), in this way we can play the three notes without having any tension.
Another way to work this would be doing stretching exercises (out of the piano), so little by little our hand gets the flexibility that we need.
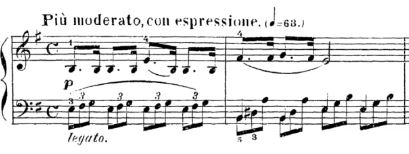
Heller Etudes op125, number 6:
Technique:
Right hand:
At first, we could have doubts wether to do the right hand with forearm or wrist movement.
In this case, looking at the tempo indication (Piú moderato), we would have to use the wrist movement because it allows us to go faster.
Left hand:
We start (as always) with forearm movement, and right away with finger movement.
We should do a minimal rotation from the last to the first note of every triplet.
We also talked about how and why not to put pedal. We would do what is called the “finger pedal” (to hold and drag the notes when played)
The fact of not putting pedal, allows you to make a more clean performance and to have more control over the overall sound that you want.
Get more information about this meeting here.
Heller, op.125 number 2
Heller op.125 number 6
Meeting 22th of april - rotation movement
In this meeting we started reviewing the Rotation Movement, step by step.
There are two stages of the movement: Spastic and controlled spastic.
We would start (as much relaxed as we can), with the controlled spastic.
1.
Stand up, and place your arm on a 90º degree angle. Relaxed, sustaining the weight with the arm, the wrist aligned with the arm and the natural curve of the fingers.
2.
Being on that position, we would turn the hand upside down (as we were holding something on the palm).
3.
Then, we will do a controlled spastic turning again the hand upside down, but in a fast and mechanical way. It is essential to make sure that we are not moving anything else but the wrist.
4.
After having repeated this a couple of times, we can go with the spastic way. “Shaking” the hand from side to side, starting on a small range and getting it bigger every time.
When playing, we use the spastic way, but for understanding and practising, we have first to do it on a non-spastic way.
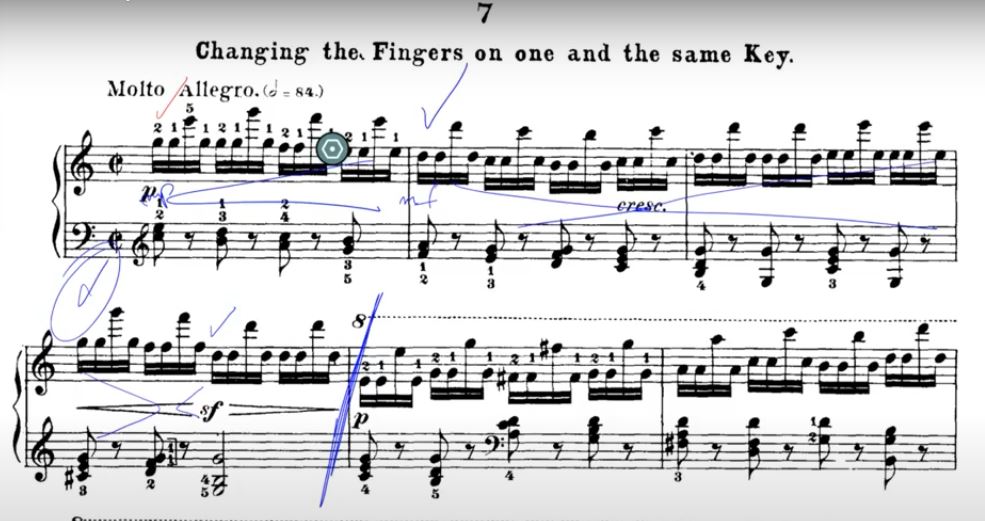
Afterwards, we analysed the first fragment of the Chopin Etude op25 n2.
We had different issues to cover:
-Fingering for the speed that the piece has. (right hand)
We have to have in mind that the finger number 1 can be a problematic finger when trying to get a fast passage done. That’s why we tried different fingers for the same notes.
In terms of movements, we would be using the finger movement, but accompanying that with a contraction and expansion of the hand all the time.
Also, the importance of the fingers for being able to do the dynamics that we want.
-Alternatives for a big and a small hand (left hand)
We can use the arm movement, having the most of the weight on the first note, “slippering” to the second one, and from there, finger movement. Remember that we have to raise our fingers to get the accents on the first note of the bar.

Scaramuzza meeting 17/04/2020
Today we started with some reflections about the Scaramuzza Technique itself.
The conclusion we got to is that this technique goes deep into the little details, nothing is left randomly. Every note, phrase or passage has a reason, a movement, and a whole method behind it.
We continued by sharing some different thoughts on the finger movement; for example, seeing them as little hammers, that goes down (without pushing of course), or as an incredibly strong structure that supports all the weight of the body
After that we analysed a fragment of the Haydn piano concerto in F Hob. XVIII:3 1st movement:
About fingering
For the left hand, we would use 5th finger to hold the G and 1,2,3,4 for the E,D,C,B. Afterwards, 1(C),4(F#),3(G).
About dynamics
(or accents, as we organize the dynamics):
First bar: We would have our first big accents on the top G of the arpeggio, a slightly less accent on the crotchet C
Second bar: The first D wouldn’t be an accented note, because is the end of the previous sentence. So our big accent on this bar would be the D/ F crotchet, that “resolves” on the C/E quaver. Finally, we accent the second C/E that resolves on B/D
About the technique:
First bar: We would use arm movement for the arpegigio, and then finger movement until the repeated C, where we would use forearm mov. Finger movement the rest of the bar.
Second bar: From the high D to the D/F crotchet we would use either forearm mov. or arm mov., depending on the intention we want that note to sound. After that, we would use finger mov, and on the repeated C/E, again, either forearm mov. or arm mov., and finally finger movement to finish.
For more information about the Scaramuzza technique click here

Scaramuzza Meeting - 08.04.2020
Today we went back to our origins:
The fundamentals and beginning of the technique.
We have recently added to our Team two teachers, who have to learn the technique. This is great to do a review of the bases of the Scaramuzza's piano technique:
First of all, we have to stand up, raise our arms (not higher than the shoulders), and let them fall with no control. Arms should fall with all the "dead weight", and we just let them move until they stop by themselves. We repeat this about two or three times, to be aware that we are completely relaxed.
Then, we sit on the piano, with the keyboard closed. We place our hands completely relaxed, trying to feel all your weight on the palm. From there, we will extend our fingers, and little by little, we will start grabbing them (as we grab an apple) while feeling the weight on the top of the fingers (we should feel pressure on the top of the fingers, so the top will be a little bit whiter). We grab them until the hand has a rounded shape.
Once our hand is rounded, with all the weight there and the body relaxed, we'll be able to lift our wrist, by doing pressure from the fingers. It's essential to lift our wrist from the weight your fingers are supporting, not from the wrist itself. We should lift it until it is on a straight line with our knuckles.
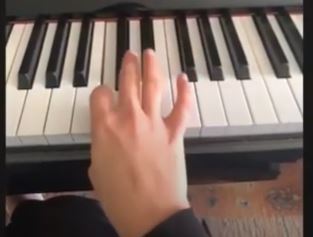
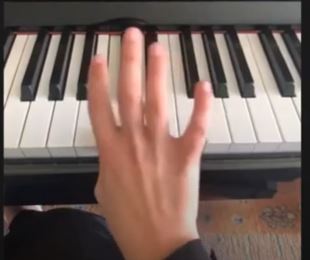
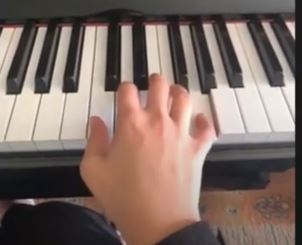
Now, being with our hand rounded, fingers supporting the weight and wrist a little bit lifted; we will start raising the fingers one by one. First finger number 2, then 5, then 1, and 4. So we will finally support all the weight in just the finger number 3 (which is one of the strongest).
From this point, we will start with the basic and first movement of the Scaramuzza's technique that we learn: Finger movement.
Feeling all the weight in the finger number 3, we will pass all that weight to finger number 2. So, slowly we place the finger number 2, feel the weight passing, and raising number 3. We will do the same process passing from 2 to 4, 4 to 5 and finally 5 to 1.
After refreshing this, we continued explaining the Forearm movement. This movement is made from the distance and falling into the keyboard. We should lift our forearm, (simulating a hammer), and once we are up, separated from the keyboard, we fall, letting all our weight fall on the piano. We try not to control the fall when falling, because if you try so, that means you are tensioning, and we don't want that. We remember that only the forearm is moving during this movement; not the elbow and not the shoulder.
For more info about the technique and future masterclasses, click here.
NEW TEAM IN GLASGOW, UK
Today we bring breaking news.
We have just launched the new website for all those piano teachers in Glasgow looking for piano students, and of course, joining our meetups.
Get to know us and our famous technique for you to teach your fellows.
Click in the link for more info.
Scaramuzza Meeting - 03.04.2020
Today we analysed the second part of this Menuet of the Mozart’s Nannerls Book. From bar 9 to 16.

This time we started by discussing the dynamics.
The progression of the melody going down by intervals of a second (B on bar 9, A on bar 10, G on bar 11), makes us think that the B should be the loudest of the three. With that, we would have an accent on the first beat of each bar; and on each bar, the accent will be smaller.
When we get to the G, the end of that melody progression, we have another G with a trill. We would use the trill to grow louder until the D on the next bar, where we will do a decrescendo. (first beat of bar number 12).
After this, something new happens; we do a crescendo from the first beat (which will not be the strong beat) of the bar number 13, so we get to the C# loud. - This is a little bit unsual because we would usually have a strong beat on the first beat of the bar. In this case, we use this dynamics because of the behaviour of the melody.-
The repeated C# (bar 13) will be weak, but to be able to do the next beat (first of the bar 14) loud, doing after that, using the trill, a decrescendo until the G.
We would finally do a small crescendo on the middle of the last bar to the appoggiatura, and, closing the phrase to finish.
We have two different proposed ways of doing the trill on bar number 11. We could either do the trill on the dotted crotchet G and then the semiquavers F and E, or "swallow" the semiquavers into the trill.
About the technique, we would start with forearm movement, as always. Then we would use the rotation movement to go from the high B to the one lower octave B. Finger movement until we have to do another jump of a 7th from A to B (bars 9 to 10), where we use the rotation.
From bar 10 to 11 we would use a slight rotation movement, to make the dynamics that we want. Forearm movement on the repeated G's, and finger movement for the rest.
Other issues that we saw were the fingering.
On the trill (bar 11) we could use 2323, 23213 so we got to the D on the next bar with finger number 2, the F# with both 4 and 5, so we stayed there with the 5 only, and when having all the weight there, going to the A# and B with 2 and 3.
W.A. Mozart - Nannerl Nr 9 14.02.2020
Today we discussed about the different articulations and movements for the different level of the students.
Pre-grade 1 level:
First line:
We would try to do the same movements on both hands so we don't have to deal with different movements on each hand. We would start with forearm movement on both hand, finger movement on both as well and then we use the forearm movement on the repeated notes , both hands at the same time. Always putting the accent on the first note of each bar. (as its a Minuet)
Second line:
We would play all with finger movement.
Pre-grade 2 and 3 level:
First line:
We could try to do a different movement (so different articulation) on each hand.
We would start with forearm movement on both, then , keep finger movement on the right and do all the left with forearm movement.
Second line:
We could play the right hand with the rotation movement, having as a "pivot" the lower note (b).
On the left we would do finger movement , and forearm movement between each bar.
How can we fight against the tensions on the elbow 02.02.2020
Pushing down on the elbow to make sure that you are sustaining all the weight with the top of the fingers. Doing pressure with the elbow from the inside to the outside, so we tension more than normally, and then when we release and relax, we notice the difference between being relaxed and tensioned.
Doing the same pressure but this time from the outside to the inside. For these two exercises, we would need the other arm or our teacher so you can be able to push against something WRIST Movement:
We would start relaxing the wrists and shaking them up and down, with no control over them. Then, we'd try to do it slowly, controlling the movement, up and down, mechanically. When we take it to the playing part, we should have our hand just a little bit more up than usual.
This would be because, in this way, when we play the note, we would be at the "resting" position of the hand. If we had the hand at the same height than normal, we would be making much more effort on the wrist at the moment of going up. We have to be very careful when doing this movement not to mix it with the forearm. Remember that the movement is exclusive of the wrist and not the whole arm.
© Copyright Scaramuzza Meetups